Download a printable version of this document here
Adsorption chromatography is most commonly used in the organic laboratory. TLC (thin layer chromatography) is performed to analyse samples or to follow reactions as they proceed, and column chromatography is used to separate and purify compounds after a reaction. The most common stationary phases used in the lab are silica (SiO2) and alumina (Al2O3), in very fine and pure powder form. Due to the fine powders both must be used in the fume hood, as they readily disperse in the air and are easily inhaled, which may cause long-term respiratory problems.
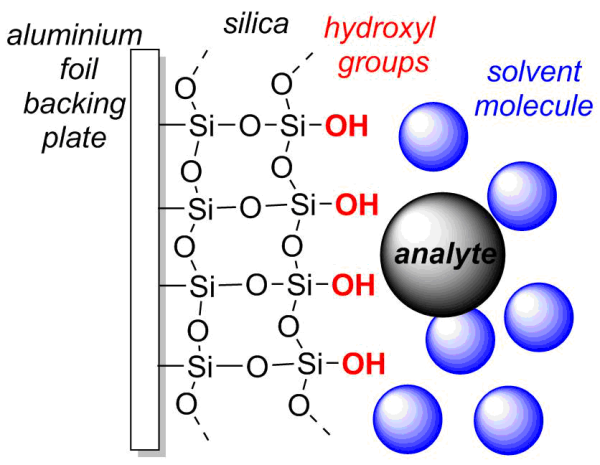
Silica TLC plates are usually supplied as silica powder supported on a plate of aluminium foil. (Large plates can be cut into small plates with scissors, typically 3 x 6 cm). The hydroxyl-terminated silica adsorbs analytes (the solute) to varying degrees, and an organic solvent is used as the mobile phase, the eluent. For a TLC plate the solvent percolates through the solid by capillary action from the bottom of the plate, whereas on a silica column, the solvent is added to the top and percolates either under gravity, or under pressure using bellows.
In general, the more polar the solvent, the more efficiently it will compete with the solute for the hydroxyl sites on the silica, and the more quickly the solute will move down the column, or up the TLC plate. Often mixtures of solvents are used in the lab as the eluent, include hexane and ethyl acetate (for mid polarity compounds), dichloromethane and methanol (for high polarity compounds).
Running and visualising TLC plates
For an example of how to run a TLC take a look at our experiment ‘Chromatography of painkiller drugs‘.
In order to perform TLC analysis, you need to spot a tiny amount of your mixture onto the TLC plate. The best way to do this is to dissolve a small amount of your sample in a relatively volatile solvent (e.g. dichloromethane) and to load it using a micro-pipette. These can be made with Bunsen burner from glass capillary tubes or pipettes.
In this video the glass blower, Steve Williams, at the University of Birmingham, is making micro-pipettes from a large glass pipette. He heats the middle of the pipette until the glass softens, and then takes it out of the flame and pulls the two halves apart. Once it cools the thin tube of pulled glass can be broken into approximately 6 cm lengths.

To load your TLC plate, first draw a line on the plate in pencil (not ink as this will run with the solvent up the plate) 1.0 cm from the bottom of the plate; this marks the starting point of your samples. Be careful to mark the silica gently, without scoring it. Then dip a micro-pipette into a solution of your sample, and make a tight spot on the plate by lightly touching the plate on the baseline at a marked point. If you are able to visualise your compound by UV, check the plate before you develop it, to make sure the sample is strong enough to see. If the sample is too weak, allow the spot to dry and reapply. This can be done several times, but allow the spot to dry each time to keep the spot size small. You can reuse the same micropipette, as long as you draw up some blank solvent and spot it onto some paper towel, between samples.
In order to develop the TLC, the easiest way to make a developing tank is with a small beaker and a watch glass, or a wide-mouthed screw-top glass jar. Line the inside of the tank with some filter paper (this helps to keep the tank saturated with solvent), and put your eluent in the bottom, so that it only comes 0.5 cm high up the tank walls.

Place the loaded TLC plate into the tank carefully, making sure the baseline is at the bottom, the back of the plate leans against the tank wall at a slight angle, and the baseline is above the level of the eluent. Place the lid (watch glass) on the tank and allow the eluent to rise up the plate, until it is about 1 cm from the top. Carefully remove the plate, mark the solvent front with a pencil, and allow the plate to dry (preferentially in a fume hood).
Finally you need to visualise the chemicals on the TLC plate, so that you can actually see them, unless the material is strongly coloured.
There are many, many different ways to visualise TLC plates, but by far the easiest and most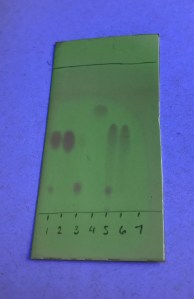 useful is to look at the plate under a UV lamp. Some aromatic compounds fluoresce under long wave (365 nm) UV, and look like a blue/purple spot on the plate. However, a lot of organic molecules absorb UV light, and can be identified on the fluorescent silica plates under short wave (254 nm) UV radiation; when viewed under short wave UV the zinc sulfide in the silica plates fluoresces green, except where an eluted substance quenches this fluorescence – these stand out as dark spots on the plate. Look at your plate under UV light and circle the spots with a pencil.
Compounds that are not UV-active can often be stained with iodine vapour, permanganate dip or many other chemical stains. To read more click here.
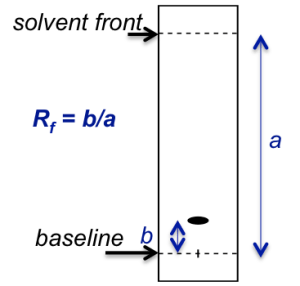 To report the observations on a TLC plate, you need to measure the retention factor, Rf: this is the relationship between the distance moved by a given TLC spot up the plate, as a fraction of the total distance travelled by the eluent. This ratio is always constant, regardless how long the TLC plate is. To measure distance ‘b’, measure from the baseline to the middle of the TLC spot.
When researchers publish the synthesis of new molecules, part of the characterisation that is usually given is the Rf in a given adsorbent/eluent system.
The following video, made by Lucy Fox, a Chemistry undergraduate student at the University of Birmingham, shows how TLC can be used to monitor the progression of a reaction
If you are having problems with developing and visualising TLC plates, take a look at our ‘TLC troubleshooting‘ page.
Running a chromatography column
Column chromatography is used regularly in the research lab to separate mixtures of chemicals; following a chemical reaction you often have a mixture of products, side-products, and unreacted reagents. The final step of the synthesis is to purify the desired product. This is often done by preparative adsorption column chromatography:
The column is packed with alumina or silica, usually mixed into a slurry with the eluent. It is important to pack the column well, without any air bubbled trapped in the column, for good separation. The sample mixture is then carefully added to the top of the column, dissolved in a small amount of the eluent. This is soaked into the top of the stationary phase, and eluent is added very carefully to the top of the column. Eluent is continually added to the top of the column, and fractions are collected from the bottom.
For an example of how to run a chromatography column, take a look at the experiment ‘Chromatography of painkiller drugs‘.
A very useful resource for describing organic chemistry techniques is the book ‘Experimental Organic Chemistry, Standard and Microscale’ (Second edition) by Harwood, Moody and Percy (ISBN 0-632-04819-0).
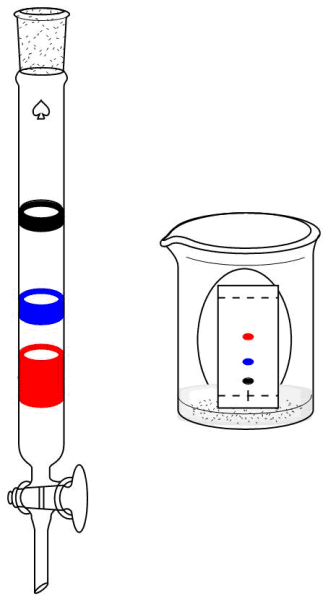
The images below show a silica column being used to purify the products of a reaction, and the fractions being analysed by TLC. The black bellows are used to apply pressure to the column and push the eluent through the silica.

This work is licensed under a Creative Commons Attribution 4.0 International License.
